Hello World Eclipse IDE
Hello World Eclipse IDE
In this article, we will cover the basics of working with Eclipse IDE. By the end of this post, you should be able to run a simple Java program using Eclipse. We assume that you have Java and Eclipse installed on your machine. We will create a Java project and a Java class that prints “Hello world!”
A common way to test something new is to create a simple “Hello World” program with the language or tools we are learning. So, let’s get started!
Eclipse Download: https://www.testingdocs.com/downloading-and-extracting-eclipse-ide/
Flowchart

Create a New Project
We need a create a java project. In the main toolbar, click on the New -> Java Project button. The below picture shows how to create a new project.
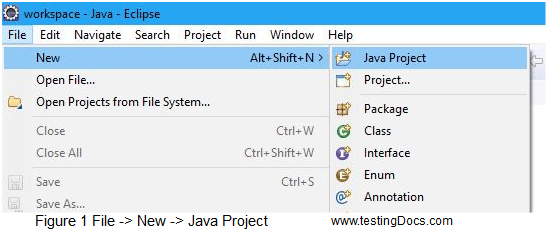
Enter the project name Sample for the project name in the dialog box, then click Finish.

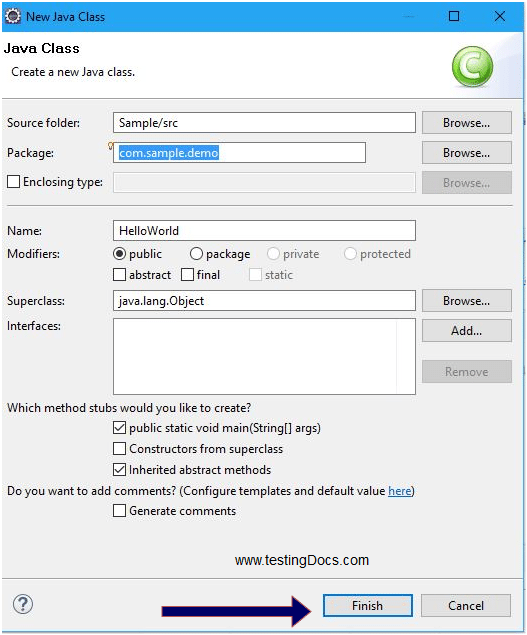
New Java class
The next step is to create a new class. In the main toolbar, click on the New Java Class button. Enter “HelloWorld” for the class name, select the checkbox to create the main() method, then click Finish. The main() method would be created for you by checking this option in the dialog box.
It’s encouraged to specify the package for your class. We have specified “com.sample.demo” as shown in the below screen. In simple terms, packages are folders that hold Java classes for better organizing and to avoid naming conflicts. You cannot have the “HelloWorld” class twice in the same package “com.sample.demo“. However, you can have the “HelloWorld” class in a different package let’s say “com.sample.practice”.
Hello World Java Application
The created class would look something like the below snippet :
package com.sample.demo;

public class HelloWorld {

  public static void main(String[] args) {
    // TODO Auto-generated method stub

  }
}
Now that you have your class, in the main() method, add the following statement to print “Hello World!” on the console. Then save your changes File -> Save or by a combination of keys Ctrl + S
System.out.println("Hello world!");
The complete program is now :
package com.sample.demo;

public class HelloWorld {

  public static void main(String[] args) {
    // TODO Auto-generated method stub
    System.out.println("Hello world!");
  }

}
// TODO Auto-generated method stub
The above line in the program is a single-line comment auto-generated and doesn’t interfere with the program. Comments add more readability to the programs.
To run your application, right-click on your class in the Package Explorer and select Run As > Java Application. The Console view should appear at the bottom and display the “Hello, world!” output.
Run the Application
After the java application run, you would see the console output that displays “Hello World!”.

Console output
To enable the console window in the eclipse, go to the main toolbar Windows –> Show View –> Console.
Hooray! You have successfully created a Hello World Java application!
—
Eclipse Tutorials
Eclipse Tutorials on this website can be found at:
For more details on the Eclipse IDE, visit the official website at:

